Preparing for the Hedge Trimming season?

Now that we have lost a month’s trimming it is more important than ever to make sure your trimmer is in top condition for a hassle free season. Shelbourne Reynolds service team have compiled a short checklist that will help you with essential servicing.

The work we recommend you carry out before the season starts is:

– Wash

– Grease

– Blow out oil cooler and fan (if fitted)

– Change gearbox oil and filters

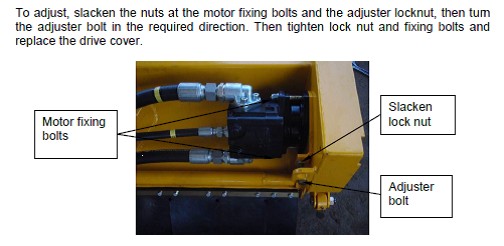
– Check belt tension

– Check bearings in the head

– Check flails and flail bolt tension

This bulletin will now take you through how to carry out this work

Be safe at work

Before carrying out any service work to a machine make sure that the tractor is switched off and in park, make sure that the trimmer is in a safe position. If you are going to be working on the head in a raised position make sure that the locking taps on the lift ram are in the closed position.

The beginning of a good service it is best practice to thoroughly wash the machine, this will then make it easy to spot any potential problems. Also thoroughly wash behind the drive guard as grease can get into this area and onto the belts (over greasing the outrigger between the motor and the pulley can cause this)

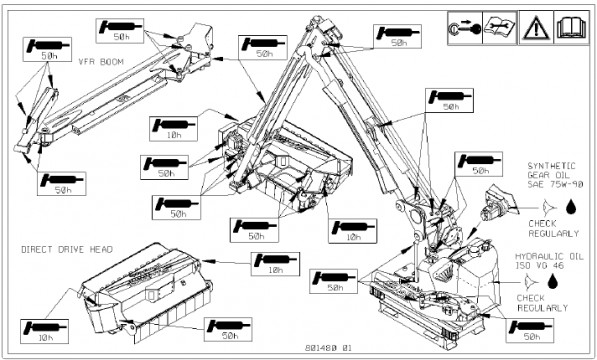
Once this is done grease all pins and bearings.

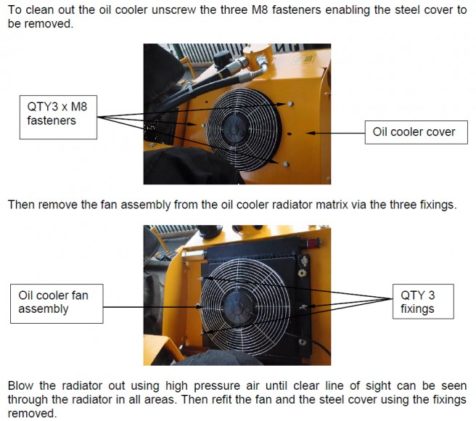
If your trimmer is fitted with an oil cooler and fan assembly, make sure this is thoroughly cleaned out.

This is the process for 700 series trimmers

Even if the fan looks clear and this process hasn’t been carried out before, chances are that debris have got behind this plate. 

It is important to follow the recommendation for service intervals regarding oil filter changes and gearbox oil changes. If the filters are not changed accordingly then contaminates can build up in the oil and cause failures. With all of our trimmers the first filter service is at 50 Hrs and 500Hrs thereafter. The gearbox oil change is also first service at 50 Hrs then 1000 Hrs or two years.

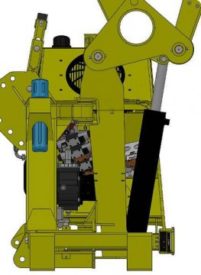
Side View of 700 series trimmer showing the sight gauge on the gearbox, oil should be visible  in the sight gauge.

HD800 series Filter Replacements

FIL-0200a filter element (return filter located on top of the tank)

FIL-0230a filter element (pressure filter located right hand side of machine behind light board)

Gearbox

Oil grade: 75w40 fully synthetic

Quantity: 1.75lt

HD700 series filter replacements

FIL-0200a filter element (return filter located on top of the tank)

FIL-0230a filter element (Pressure filter located on trimmer A frame by right hand wheel of tractor)

Gearbox

Oil grade: 75w90 fully synthetic

Quantity: 1.75lt


600 series filter replacements

FIL-0250 Filter element (Return filter located on top of the tank under the lid)

FIL-0230a filter element (Pressure filter located on trimmer A frame by right hand wheel of tractor)

Gearbox

Oil grade:  75w90 fully synthetic

Quantity: 1.75 Lt

200 300 400 series filter replacements

Please contact your dealer stating the serial number

Gearbox

Oil grade: 75w90 fully synthetic

Quantity:  0.50lt

Checking the belt tension

With all our machines it is best practice to take off the drive guard and visually inspect the belt and pulleys. After many hours the pulleys can become worn. This is identified by a glazed look on the pulley and a grove in the working face  which can cause the belts to slip.

The best way to check the tension is to rotate the belt towards you if the working face of the belt can be rotated more than 90deg then the belt needs more tension

Check bearings

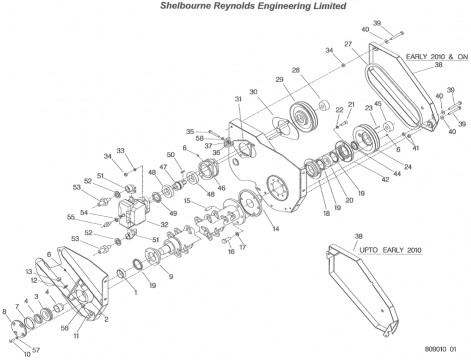
With the HD series heads and 600 series heads the quickest way to check the bearings is to put the head vertical with the drive towards the ground, using a small bar check if there is any upwards movement under the drive disc item 14 on figure 1. If there is any upwards movement the lock collar on the idle bearing is loose or bearings need to be replaced.

For part numbers refer to your parts manual.

With HD series heads and 600 series heads, even if the bearings are in good order also check the locking bush in the idle bearing, if left loose this can cause vibrations and damage to bearings.

How to check idle bearing

Remove item 8 (bearing cover)

Remove item 7 (spacer)

Using special tool (part number 801390 01) that can be obtained from your dealer via Shelbourne Reynolds, loosen off the nut (item 4) and re torque to 70nm replace item 7 and 8 and grease bearing

Flail condition

For optimal cutting check that the entire flail shaft and all its components are in good order

– General condition of the shaft paying attention to the lugs that the bolts go through

– All flails have even wear and are all the same type

– Sharpen worn flails with small grinder using a sanding pad. Paying attention not the get the flail too hot and causing the tip of the flail to blue, if this happens the blue edge will chip

Re torque all flail bolts to 270nm (200ft/lb